Amerigo Moscaroli - Game Programmer
  • Home
  • University Projects
    • Eye-Snipe
    • Airport Mayhem
    • Star-Buck
    • HLSL Demos
  • Professional Work
    • Race Yourself - Glass (Beta)
    • Race Yourself - Mobile (Beta)
    • Race Yourself - Gear
    • Crazy Slots Adventure
    • Cops 'n' Robbers: World Tour
  • Tutorials
    • OpenGL ES Video Tutorials
    • Creating Cross Platform Games with Xamarin
    • Creating a 2D Platformer
    • Create and Monetize your C# Games on iOS and Android
  • Personal Projects
    • A Crack in Time - Dev Blog
    • Time Runner

Player Attacks Part 3

3/23/2019

0 Comments

 
This will be the last part for the attack system for now - I will create the weapon & register the hitbox!
I downloaded the weapon pack from Quaternius' Patreon account for use with my player character (his Patreon can be found here). 
I used the Dagger asset from this pack, and started by creating a new C++ class which inherits from Actor. For now this class is pretty simple, with a method to get the hitbox of the weapon and a constructor. In the constructor I created a StaticMeshComponent and set it as the root component of the Actor, and then I create a BoxComponent to be used for the collision of the attack. 
Picture
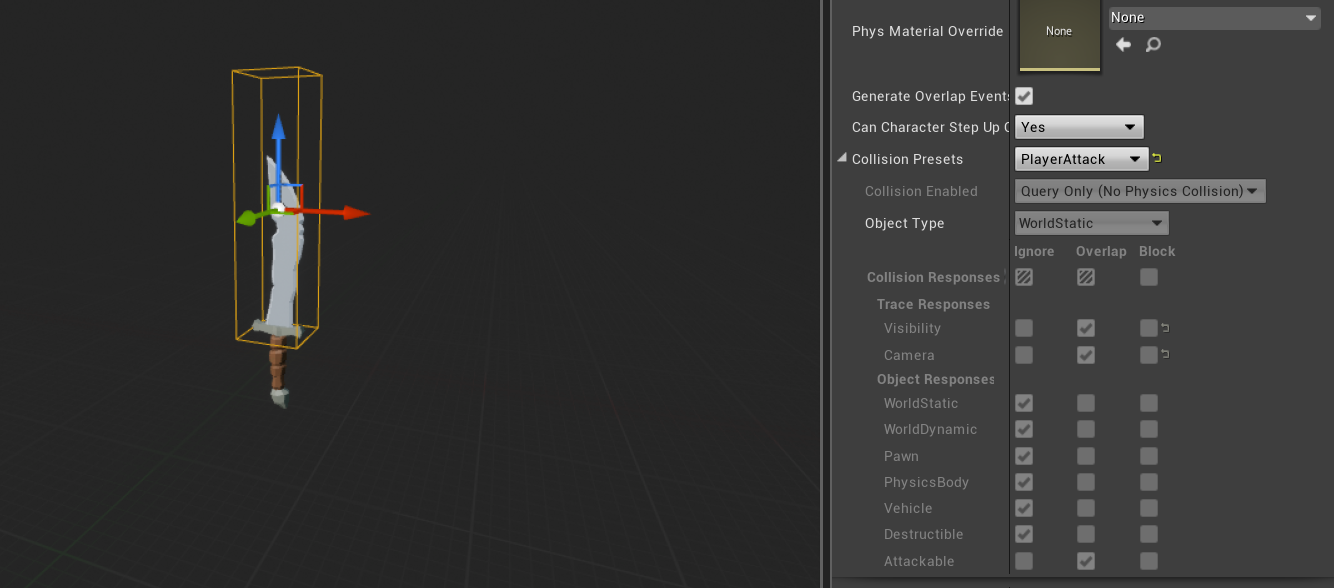
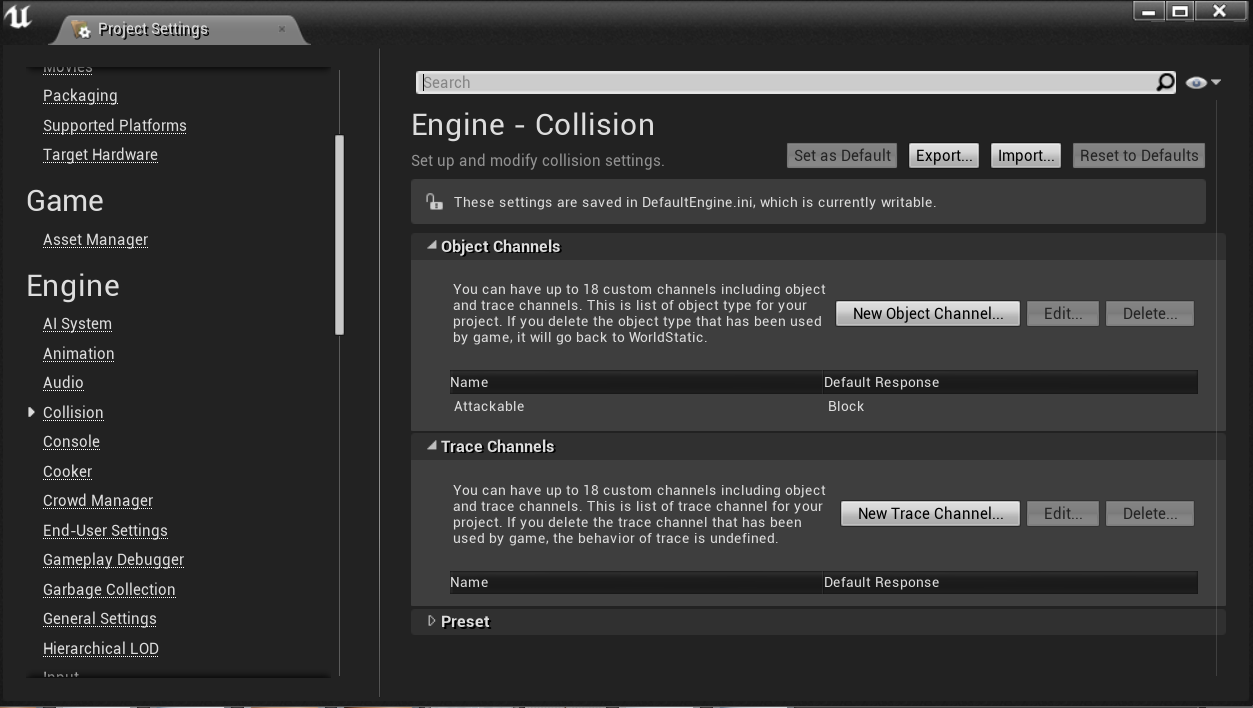
With this class set up, I create a blueprint class which inherited from this one - this way I can set the mesh through blueprint & easily edit properties of the hit box. For the hitbox, I added a new Object Channel for collision filtering for an Attackable object:
Picture
I also created two new presets for the attacking - once for the PlayerAttack which overlaps the Attackable objects, and one for the Attackable which blocks all incoming objects.
​For the Dagger blueprint, I created a hitbox that was slightly bigger than the dagger to make the weapon collisions a bit more player-friendly. The end result of the blueprint was this:

Picture
The next step is to have the dagger spawn in the Player's hand. I opened up my Character class and in the header I added a couple of new fields - a TSubclassOf<Dagger> and the Dagger instance itself. I used this method so that in the blueprint I am able to easily change the Dagger class if I ever need to - in the future I'll make a subclass called Weapon so that I can switch the type of weapon the player has. I also added a getter for the weapon.
In the BeginPlay of my character I spawned my Dagger and attached it to the sword socket on the player:
Picture
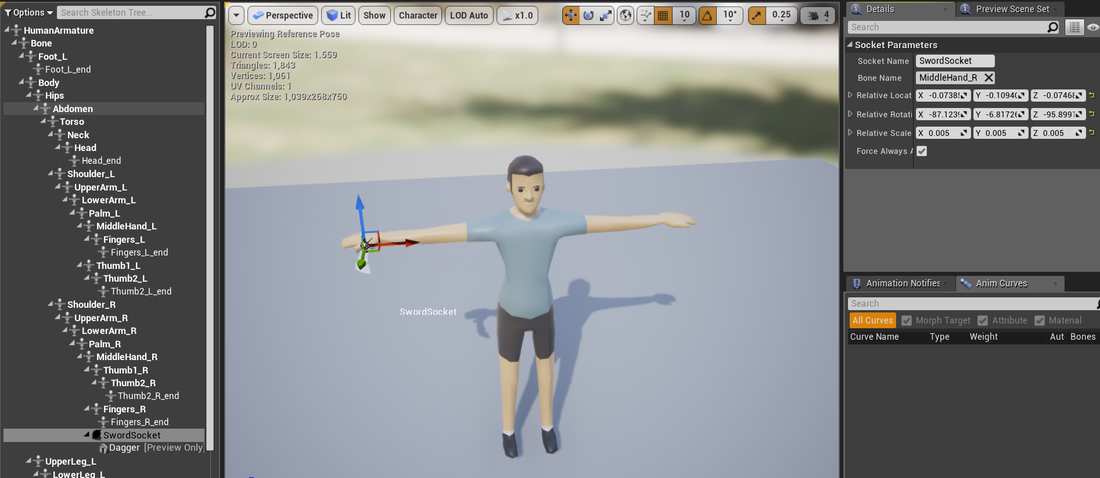
Next I need to edit my character's skeleton to actually add the socket for the weapon. In the skeleton, I added the socket to the MiddleHand_R bone and set the transforms so that the dagger fits correctly into the hand:
Picture
The last class I need to edit is the Player's Attack state so that I can activate the weapon. 
First, I updated the SetCharacter method in the state to cast the character to a PlayerCharacter object - this way I can retrieve the weapon when required:
Picture
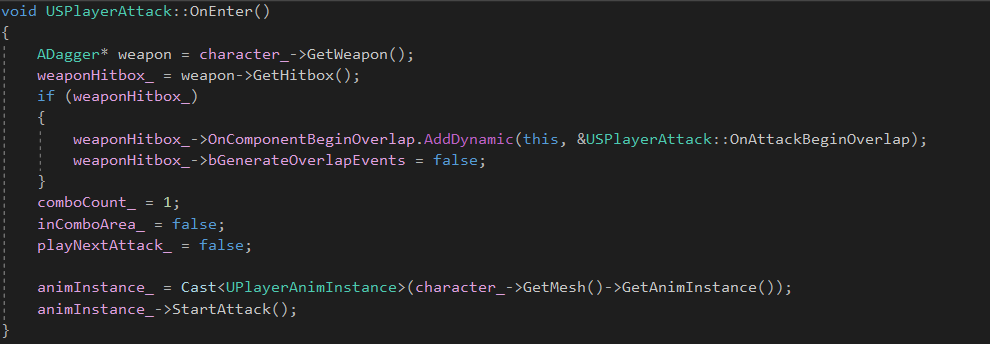
Next, I updated the OnEnter method so that I can retrieve the player's weapon & the hitbox, and then register my callback for when the collision box overlaps an object:
Picture
For the next step I had to add the method for the callback. For this method I had to add a couple of new fields to my state:
  • hitActors_ - This is a TArray of all the Actors that have been hit in the current attack. This will be compared against during the overlap so that an Actor isn't accidentally hit twice if they're moving.
  • damage_ - This is the amount of damage that the attack will perform.
In the callback method, I first iterate through the list of actors and check that the current actor hasn't already been hit. If it hasn't I add the actor to the list and apply point damage to it:
Picture
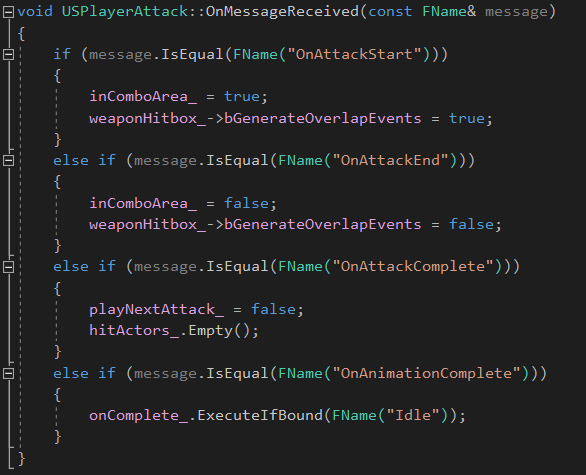
Next I had to update the OnMessageReceived method to perform extra functionality during certain messages:
  • In OnAttackStart, I allow the hitbox to generate overlap events
  • In OnAttackEnd, I disable the hitbox's ability to generate overlap events again
  • In OnAttackComplete, I empty the list of actors so that the next attack starts fresh, allowing all objects to be hit again. 
Picture
Finally, in the OnExit method if the hitbox exists I de-register my callback from the hitbox.
Picture
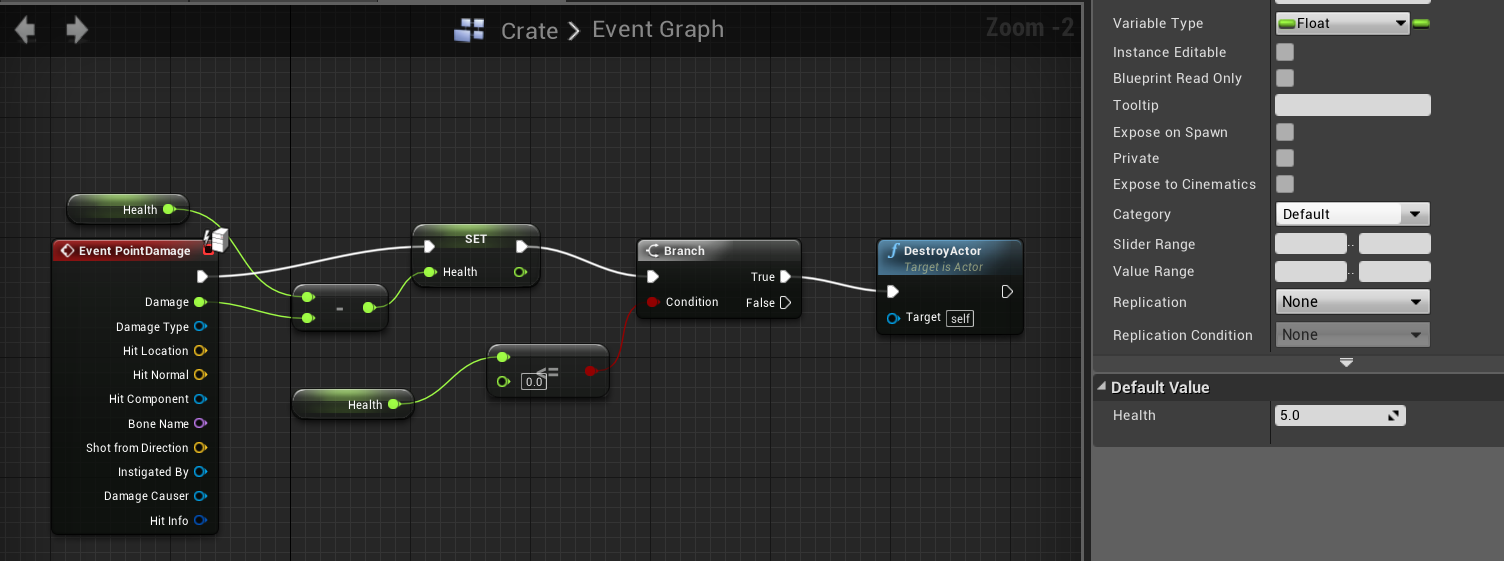
Now all I needed to do was test the attack! For testing purposes I created a new Blueprint class for a crate, and attach a box mesh to the object. In the event graph, I added a node for the PointDamage event and used this to damage the crate. The health is decremented, and if it is less than zero the crate is destroyed. I also set the default of the health to 5 so that it can be destroyed in one hit.
Picture
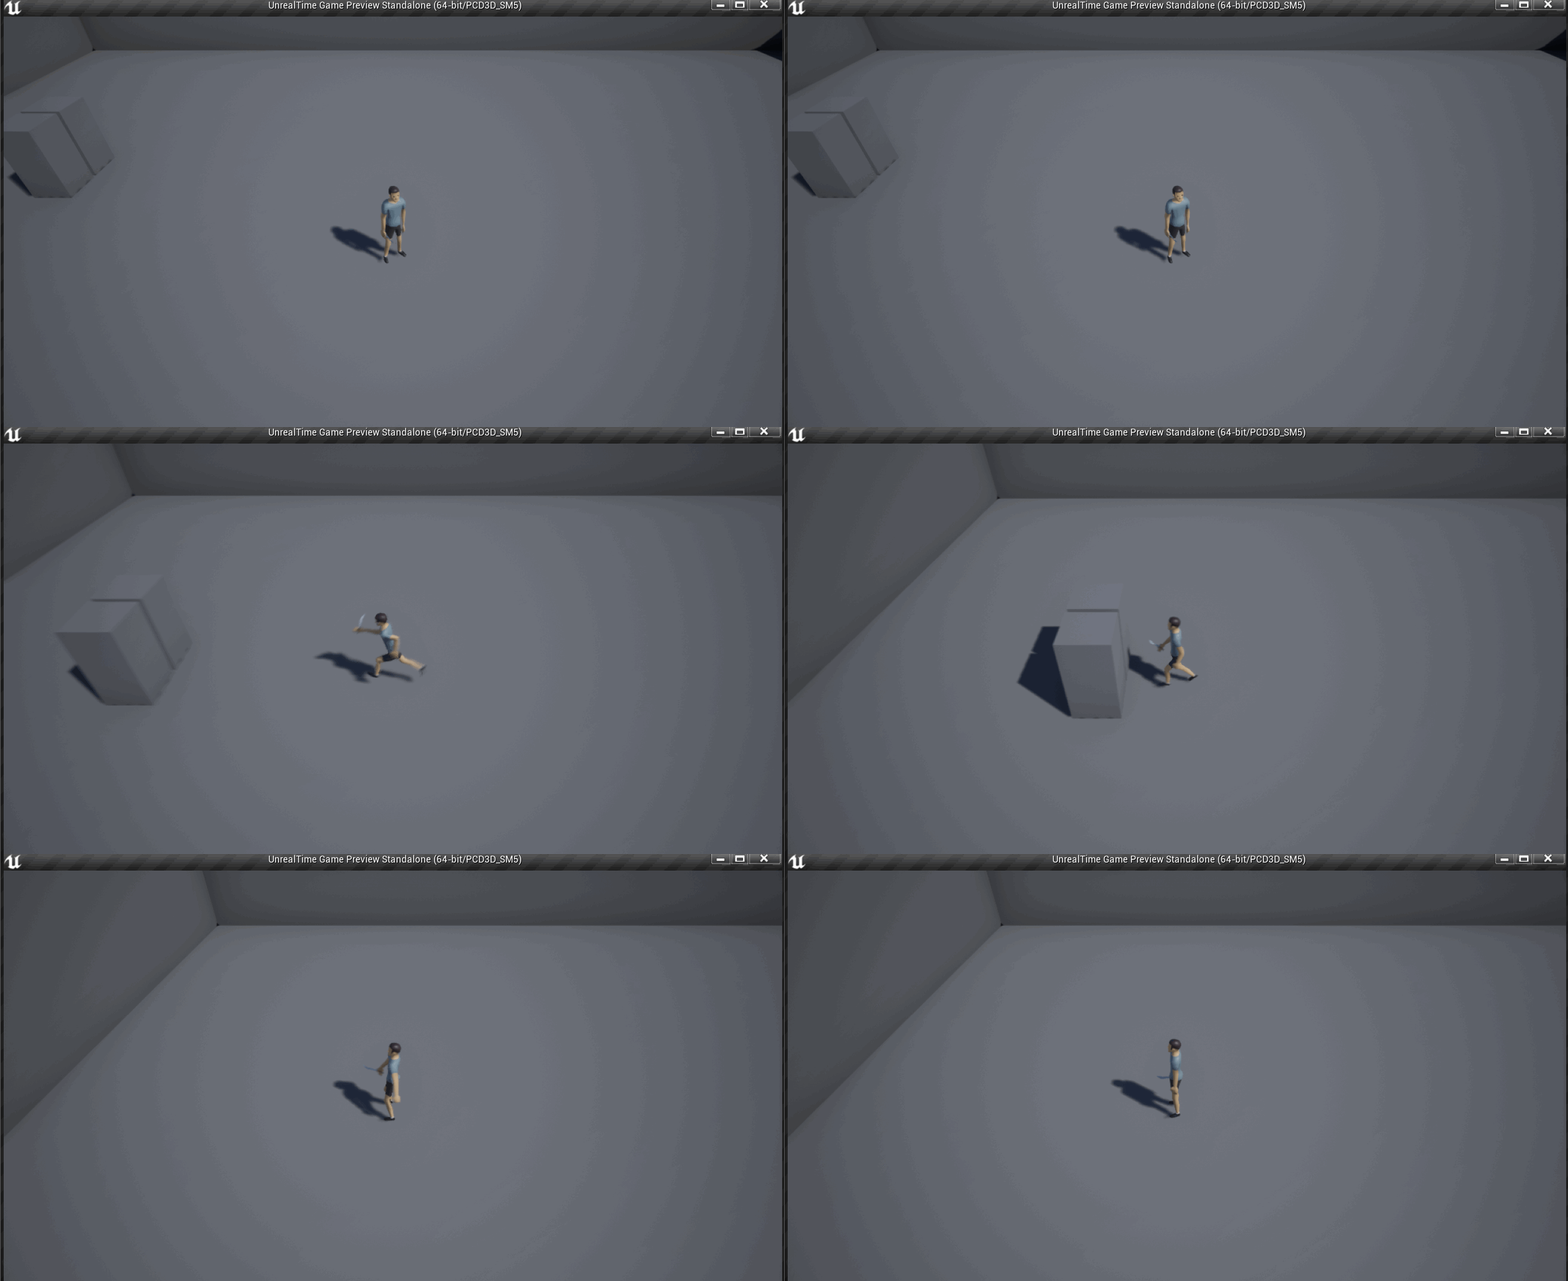
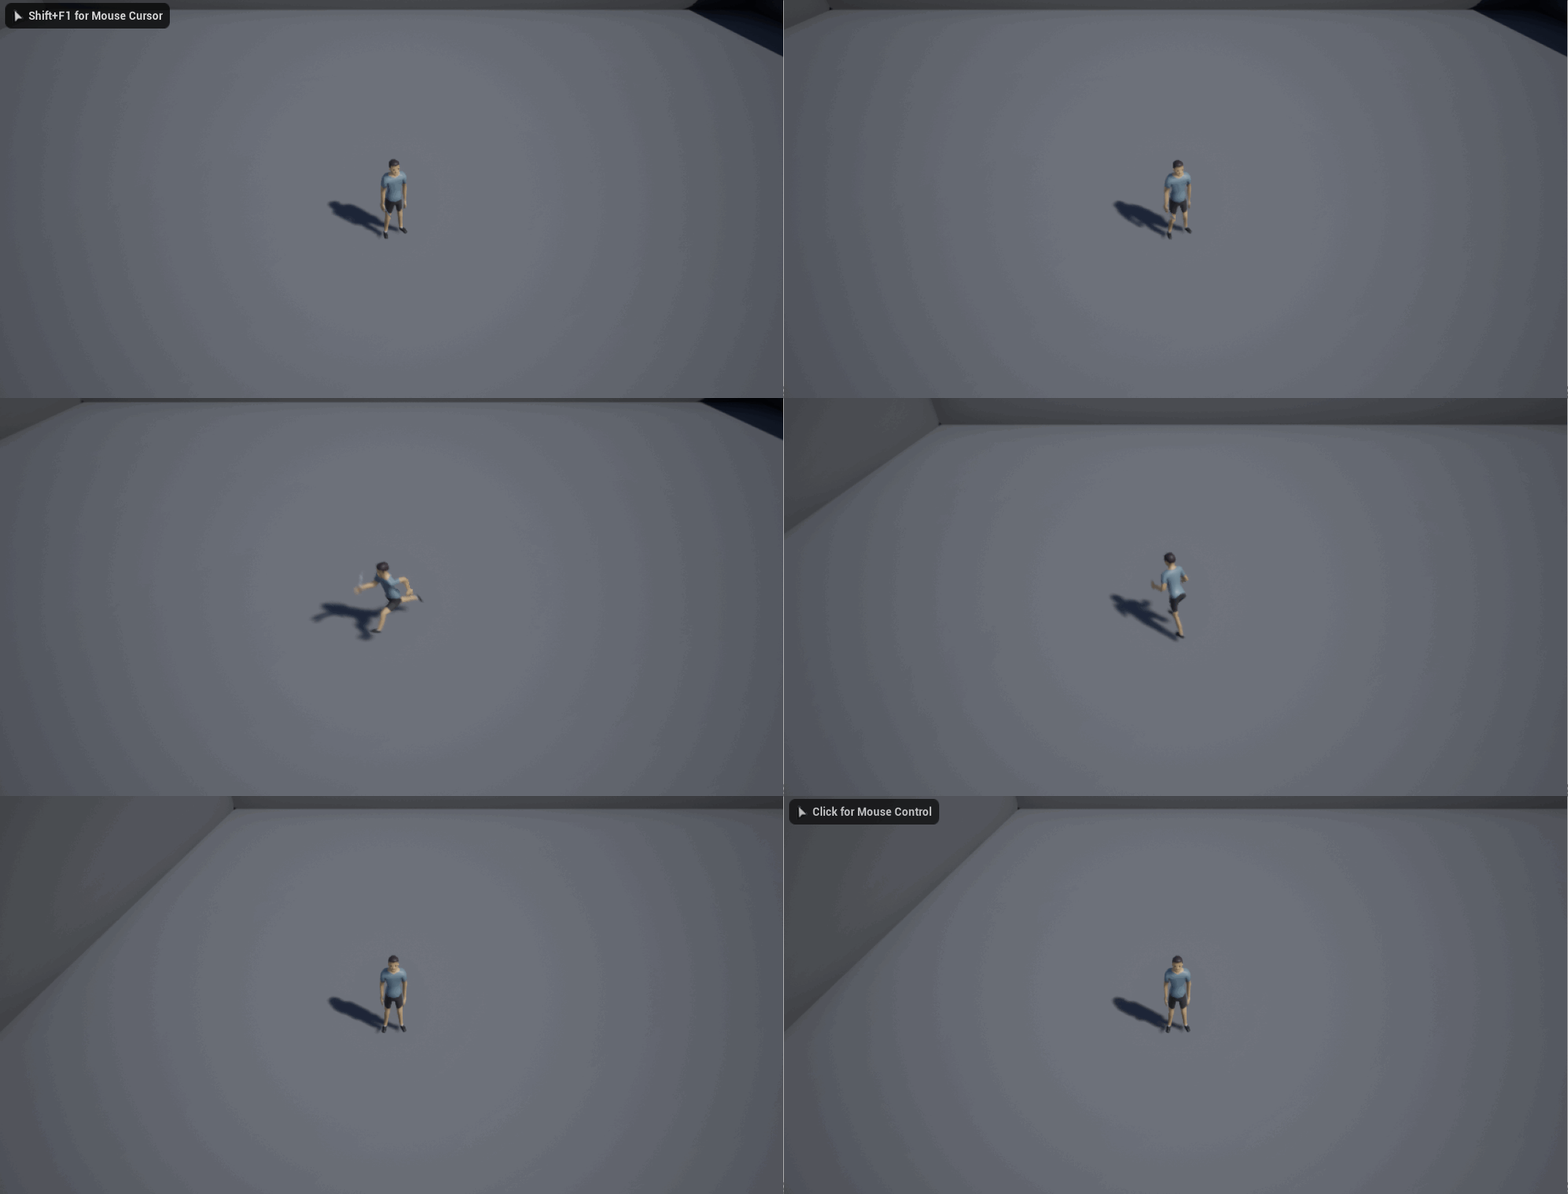
Now, when I run the game you can see the attack!
Picture
With the attack system now in place, the next area of the game I'm going to be looking at is the Stop Time ability! This system will also be split into multiple posts, so stay tuned!
0 Comments

Player Attacks Part 2

3/11/2019

0 Comments

 
Now that the animation is all set-up, the next thing I needed to implement was the attack state for the player. For my game, I'm currently going to have a combo system where the player can press the attack button multiple times to chain a melee attack. In the future, I might look at having different melee attacks such as strong attacks and special attacks, but for now I'll focus on the standard melee attacks.

First, I needed to add a new state class that the player can enter for attacking. I added multiple variables to this class:
  • The animation instance - used to trigger the attack animation montage
  • An int32 for the current combo count - this is to keep track of how many attacks the player has completed
  • An int32 for the maximum combo count - used to prevent too many attacks
  • A bool for whether or not a combo has been chained - this prevents spamming of the attack button
  • A bool for whether or not the player is in the "combo area" - this way, the player can only chain attacks between certain frames of the animation
I started overriding the OnEnter method from the IState interface - in this method I have reset the variables and told the animation to start the attack montage.
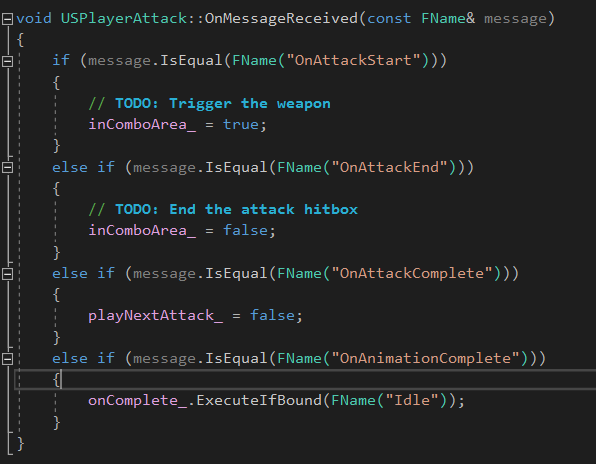
Next, I overrode the OnMessageReceived method, which is where the bulk of the logic will be as the state will handle messages from the animation - this method looks like the following:
Picture
In the OnAttackStart and OnAttackEnd, I will eventually activate the weapon however for now I have activated & deactivated the combo area. The OnAttackComplete message resets the playNextAttack boolean so that the player can trigger another combo attack. Finally, the OnAnimationComplete message will change the state to the Idle state.
Next I have overridden the the OnActionInputReceived method, where I check if the input is the Attack input, and if it is the player can attempt to combo an attack. The method looks like the following:
Picture
Finally, I overrode the OnExit method to stop the attack on the animation instance.

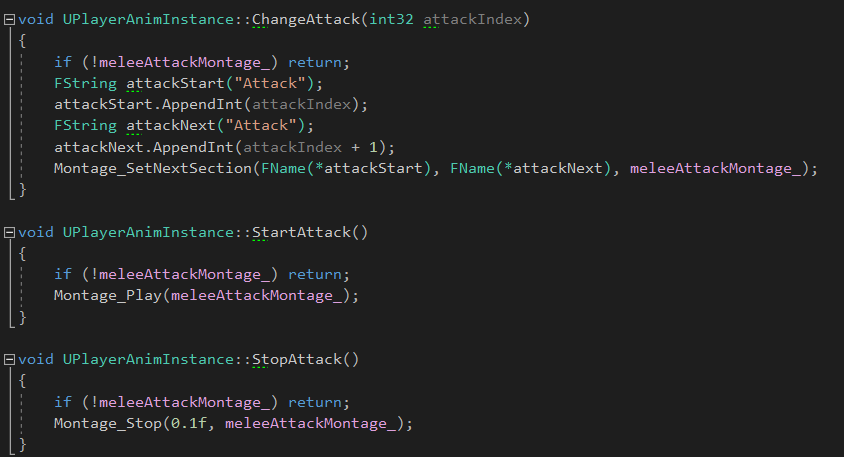
I had to create a subclass of the animation instance so I could add my own custom methods for performing the attacks. I added a variable for the animation montage of the attack, and 3 methods - StartAttack, ChangeAttack and StopAttack:
Picture
In the ChangeAttack method, I form the section names for the montage & tell the montage to set the next section. The StartAttack method simply starts the montage, and the StopAttack method stops the montage. Once this class was complete I re-parented the animation blueprint of the player to my new class.
The last step was to add the state to the PlayerController. Now, the player can attack:
Picture
In the next post I will discuss how I implemented the hitbox & the particle effect for the attack.
0 Comments

Player Attacks - Part 1

3/11/2019

0 Comments

 
I've decided to split the player attack explanation into multiple parts, as there's quite a lot to go through. This part will mainly explain how the animations are played for the player's attacks & the notifications into the PlayerController.

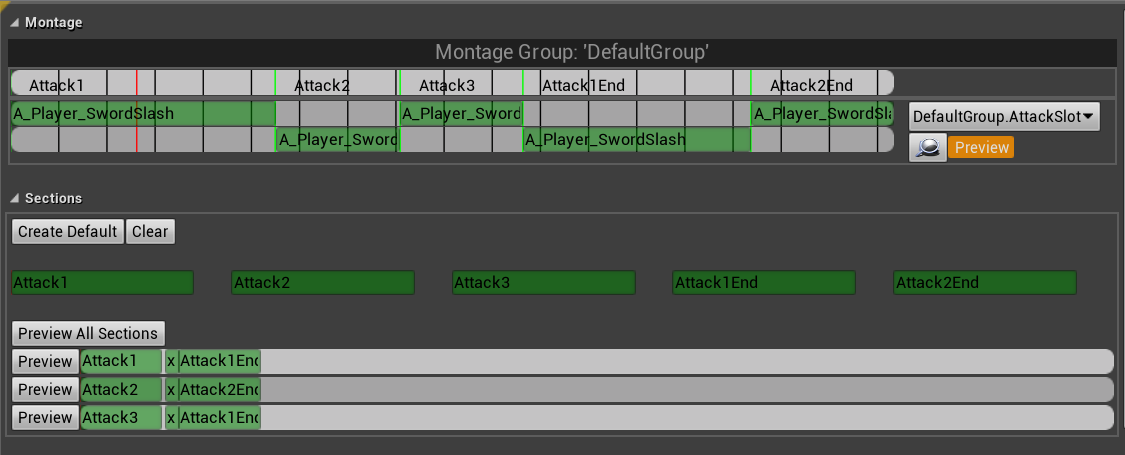
I decided to use an Animation Montage to put together the sword attack combos. For this temporary asset, I only had the 1 attack animation so to create the combo I added the animation multiple times into the montage, reversing the next animation for the follow-up attack. I then trimmed each animation so it flows directly into each other and split each part into sections, and by the end the sections looked like this:
Picture
By default, each section will play an animation and if it is not told to play another section it will play the wind-down animation and end the attack.
For the next part of this montage I needed to add the notify events so that the state can be messaged when the attack end, when the animation is complete and when the attack should be activated.
For the AttackComplete and AnimationComplete events I used a basic Notify, whereas for the Attack active state I used a NotifyState - this way I can make the attack active with the NotifyBegin and NotifyEnd methods.
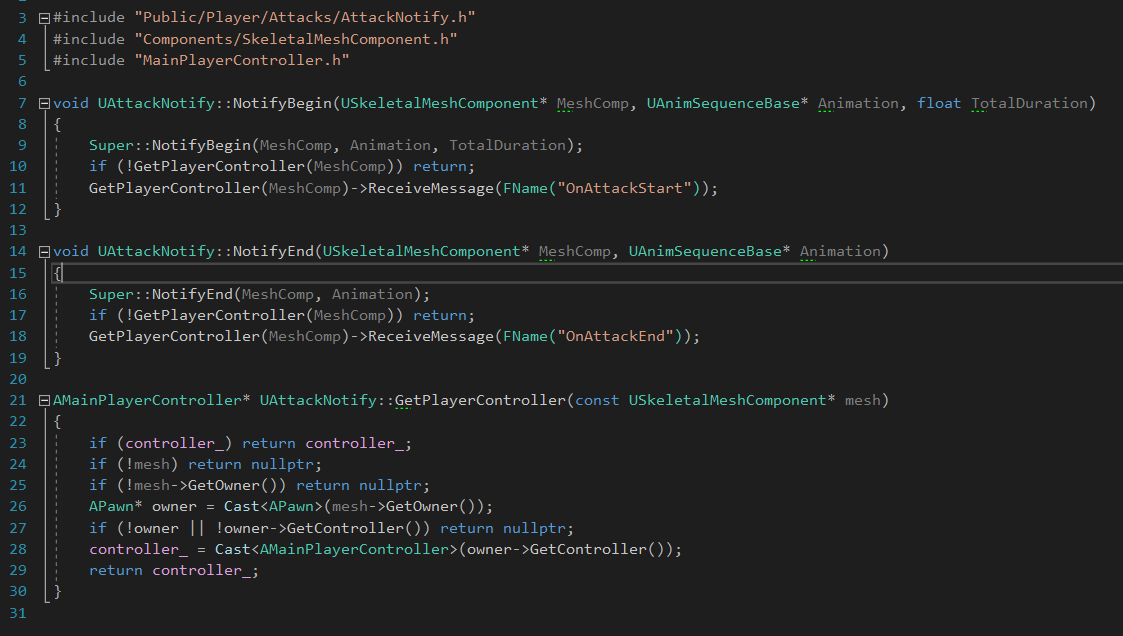
I created a subclass for the NotifyState which is used to notify the PlayerController about the attack becoming active using a message. Currently, the NotifyState only works with the PlayerController but in the future I might need to refactor this to be more generic. In the end, this class looks like this: 
Picture
I added multiple null checks into the GetPlayerController method to ensure that the PlayerController is valid, and I send the attack start & end message through to the player controller if it is. 
​I then added the notifications into the animation montage at key points during each animation, so the final result looked like this:
Picture
Now with the montage setup I needed to add the montage to the animation blueprint. First, I updated the AnimGraph to play the montage between the default pose like so:
Picture
I assigned the slot to be the AttackSlot that I defined, and hooked up the animation to the final animation pose.
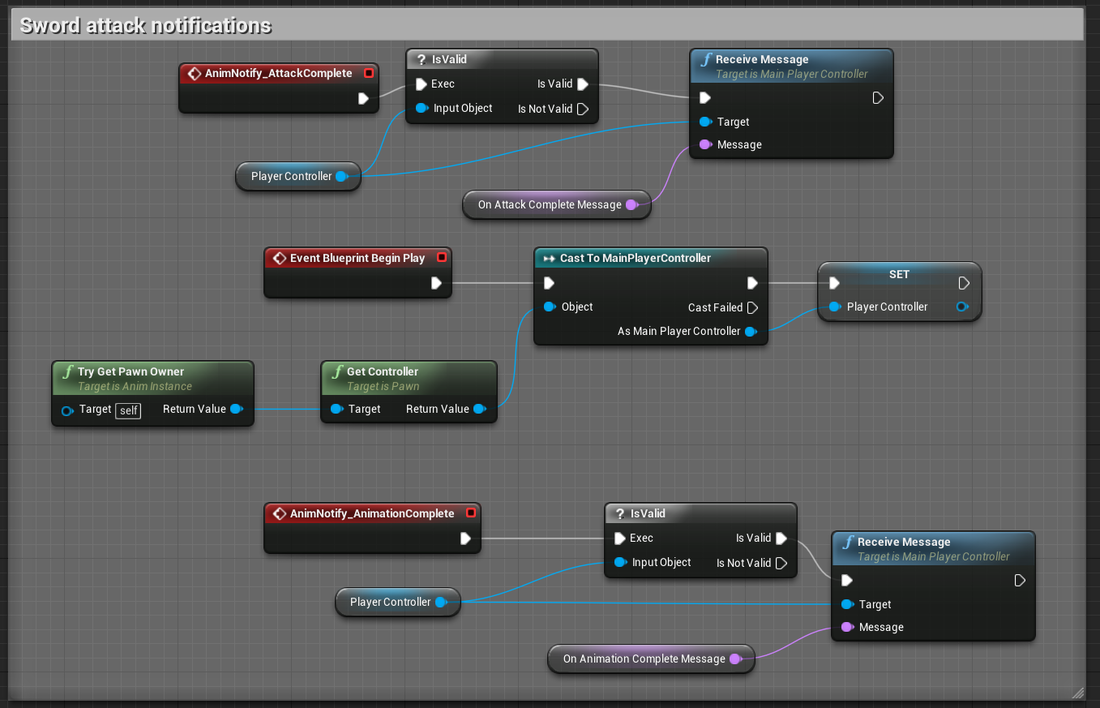
I then updated the EventGraph for the new animation to allow for sending messages to the player controller after the montage events:
Picture
I added three variables to the blueprint - an FName for the Attack completing, an FName for the Animation completing and a PlayerController instance. I added the PlayerController so that I wouldn't have to continuously cast the controller for the notifies.
I then implemented the BeginPlay method to obtain the player controller & set it.
Finally I added the events for both AnimNotify events which will simply send a message to the player controller.

The animation blueprint & the animation are now both ready for the attacks! The next post will discuss the implementation of the Attack state.
0 Comments

Character State

3/4/2019

0 Comments

 
So before I jumped into creating the attack logic I decided to do a minor refactor to allow for the PlayerController to control the current state. The idea behind this is that the state will dictate what exactly to do with any input or other messages that it receives from the controller. Initially I'm going to have the following states for the character:
  • Idle/Movement - the state where the player can navigate the map & jump etc.
  • Attack - The state where the player can attack enemies with his sword.
  • Interact - Where the player can interact with the environment/NPCs
  • Power/Abilities - Certain abilities may use different controls or messages. I'll flesh this out as I develop the abilities.
As the game progresses I imagine there'll be more states required to separate character logic, however for now these states should work well.

I decided to use an interface for the character state called IState, however I encountered a number of issues while creating the interface. This was mainly due to documentation online being seemingly catered to the Blueprint implementation of the interface. 

Documentation online showed that interfaces should be implemented via the UFUNCTION macro with the  BlueprintNativeEvent or BlueprintImplementableEvent tag. Using this method, in the class that inherits from the interface the method needs to override Method_Implementation() instead of just Method(). Then, to call the method, you can use the static method in the interface and pass in the object you want to call the method on. For example, with an interface callled IState and a method called OnEnter, call IState::Execute_OnEnter(myActor).

 However, for a pure C++ implementation, you can use standard pure virtual methods to define the interface methods & override them as usual.

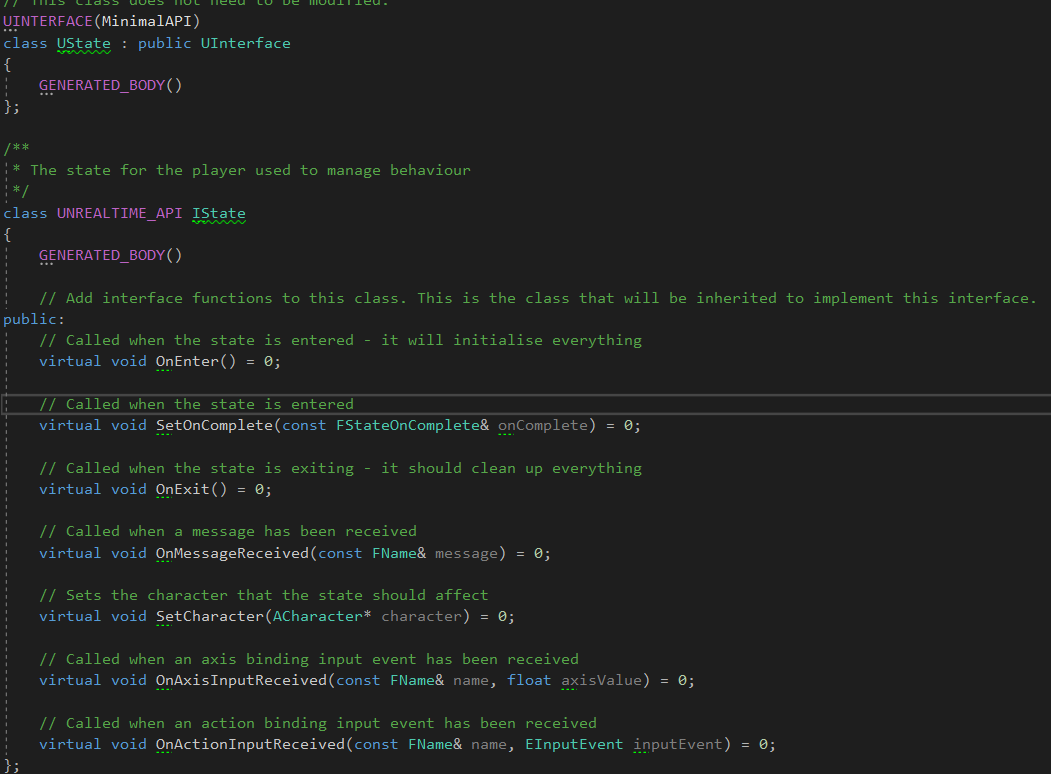
I first created a new class in Unreal making it a subclass of UInterface. With the interface, all methods are defined in the class prefixed with I, so my state looks like this:
Picture
So when a state begins, the OnEnter is called and when its complete OnExit is called. When the states are created the PlayerController sets the OnComplete callback and the Character that the state will alter. When the PlayerController receives any input or messages, they are forwarded on to the state. For the OnComplete callback and the Character, I decided to keep those methods pure as interfaces should not contain any logic.
For the OnComplete callback, I used Unreal's Dynamic Delegate with 1 parameter so that the state can tell the controller which state to enter next. The delegate looks like this:
Picture
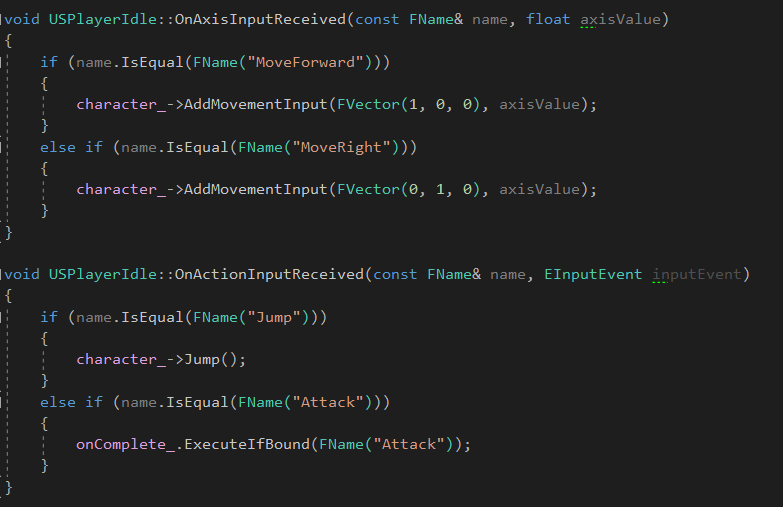
I then added a new state for the player called USPlayerIdle, which inherits from UObject and IState. For this state, I moved the movement logic in from the PlayerController which looks like this:
Picture
In the OnActionInputReceived method, I've added a check for the Attack input binding which will execute the OnComplete callback to start the Attack state. The rest of the state is empty for now. 

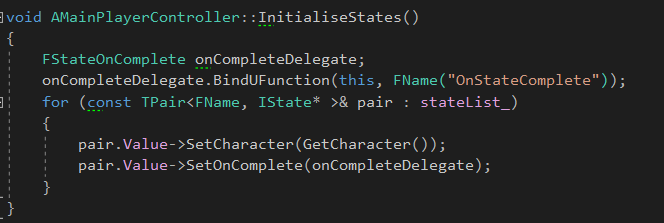
The last change I had to perform was to the PlayerController to take into account the player's state. I've added a new PopulateStateList method which will fill a TMap with implementations of the IState interface, with the key being an FName. I added an InitialiseStates method which then passes through the OnComplete delegate and the character to each state - this method looks like the following:
Picture
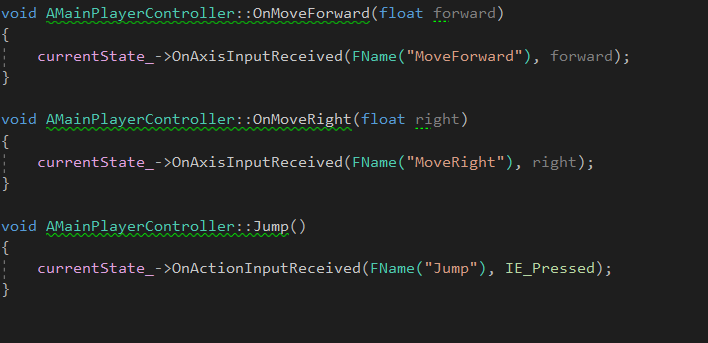
In BeginPlay, I call the two new methods & set the current state to be my new Idle/Movement state. Finally, I altered the input methods to pass the input to the current state as so:
Picture
So now its back to where it was before, but cleaner!

Next post will be the Attack implementation, which might be split into 2 depending on the length.
0 Comments

Changing Character

2/26/2019

0 Comments

 
So I managed to get the character moving around, but now I need to get a character to attack with a sword. To do this, I've had to switch characters - so I'll show how I did that!

The model that I used came from a Patreon named Quaternius, he has some great low poly models that you can check out here.

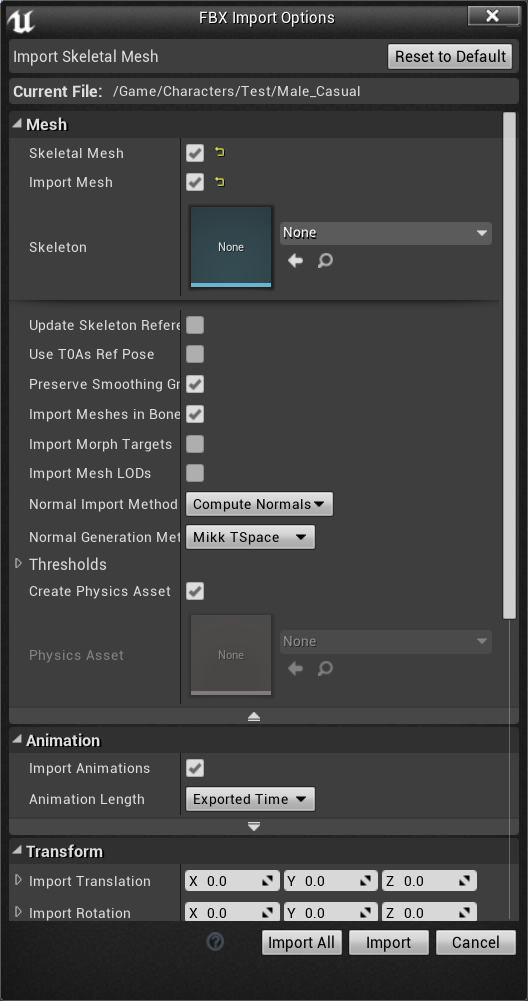
First I imported the model into Unreal, drag the model in and in the dialog ensure that you select Import Animations under the animation tab:
Picture
Once the process is complete, the model should be available in Unreal.

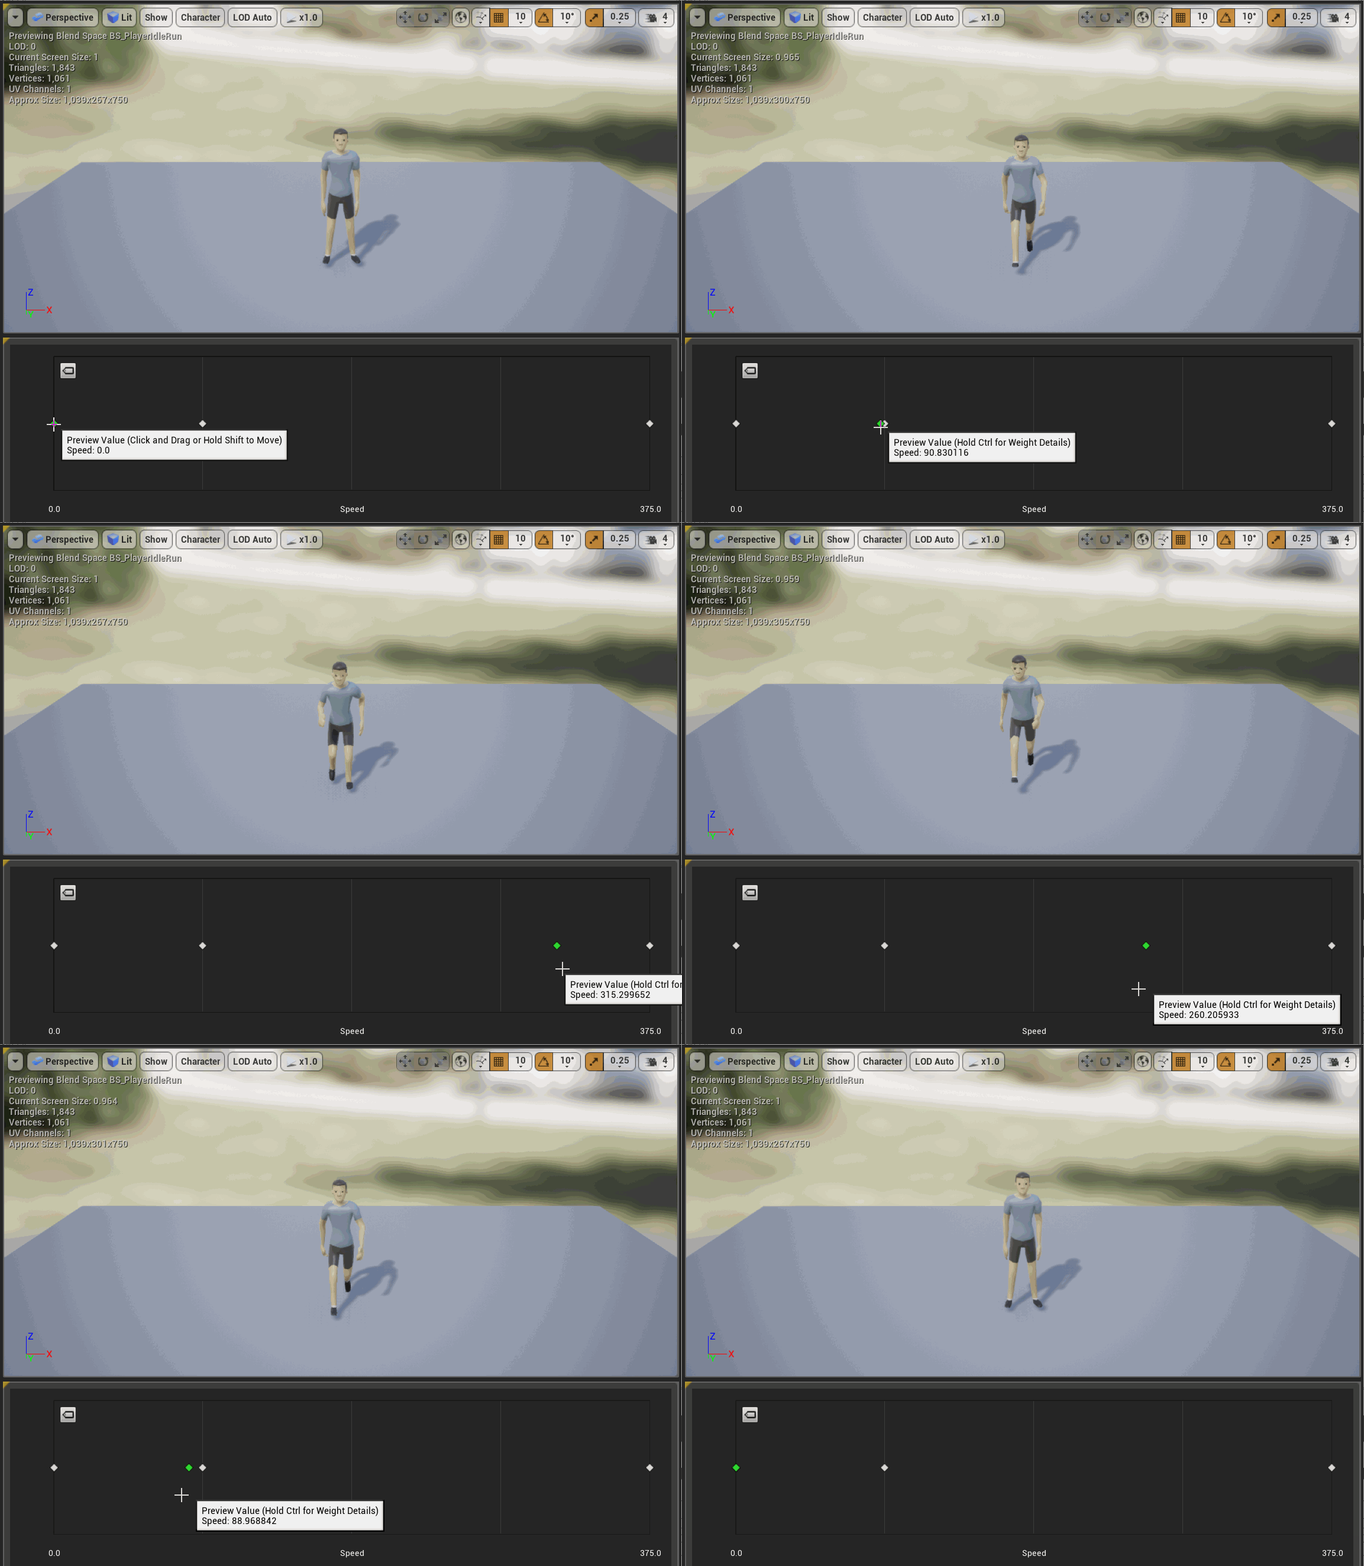
The next thing I needed to do was to rework the animation blueprint for the new character. I decided to create a new blueprint rather than rework the existing one as it would be simpler to work it that way. However, I did base it on the previous one. For the run animation, I used a BlendSpace between the Idle, Walk & Run animations so that as the player's speed increases, it will change the animation as seen below.
Picture
Next I made the blueprint for the animation - this is essentially a copy of the other animation blueprint but with the new character's animations. 
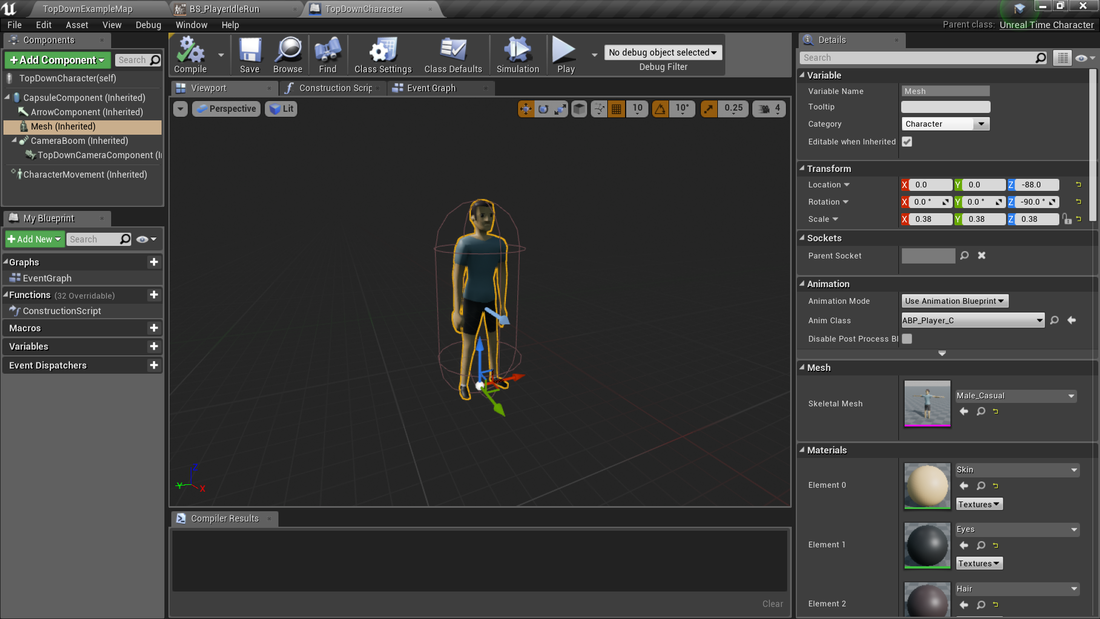
Finally, in the character blueprint on the mesh component I changed the skeletal mesh and selected my new animation blueprint as seen below:
Picture
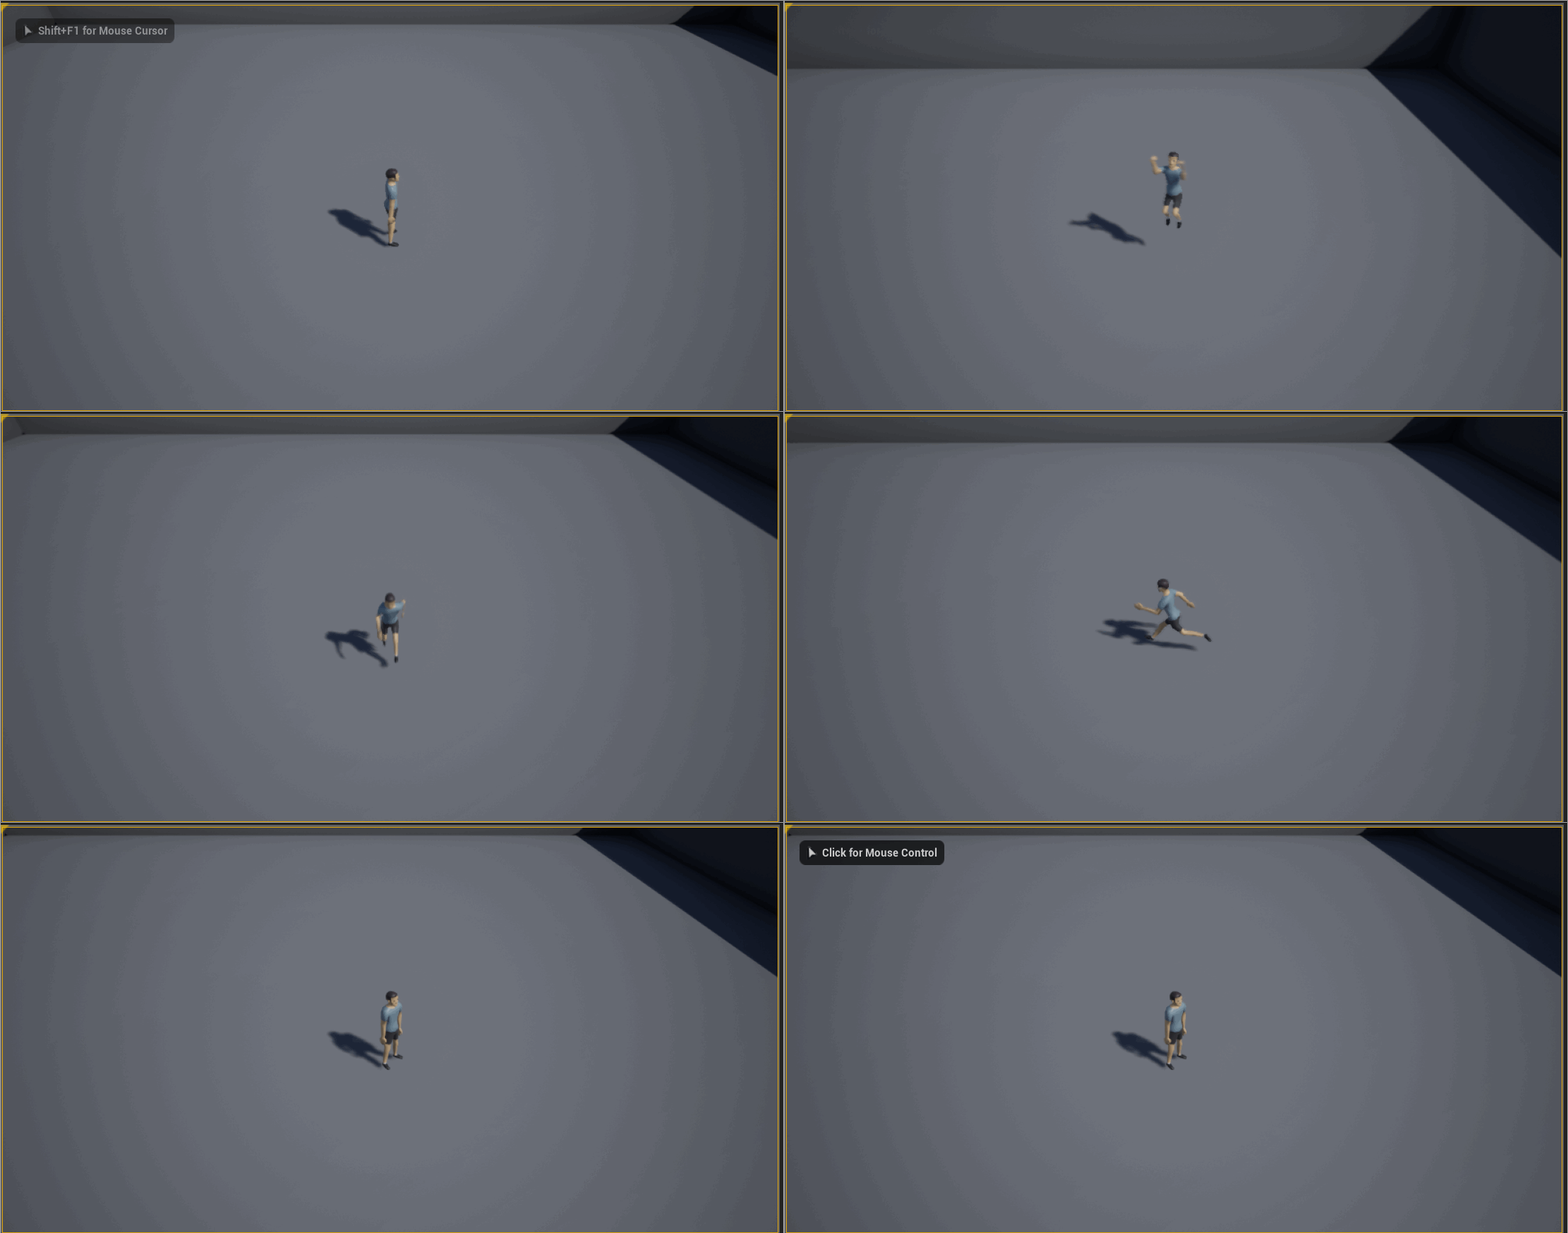
Now, if I play the game we can see the new character!
Picture
The next target for the project will be an attack system.
0 Comments

Character Movement

2/25/2019

0 Comments

 
Fresh start on a new project - it's always exciting! I'm going to use this blog post to detail how I set up the project & getting the character to move in the way that I want.

I created the project using the Unreal template for a top down game with C++. This gave me a bit of a head-start on the project, however the movement isn't how I planned it - the demo works by clicking where you want the player to move! I'll show how I switched it to keyboard & GamePad movement.

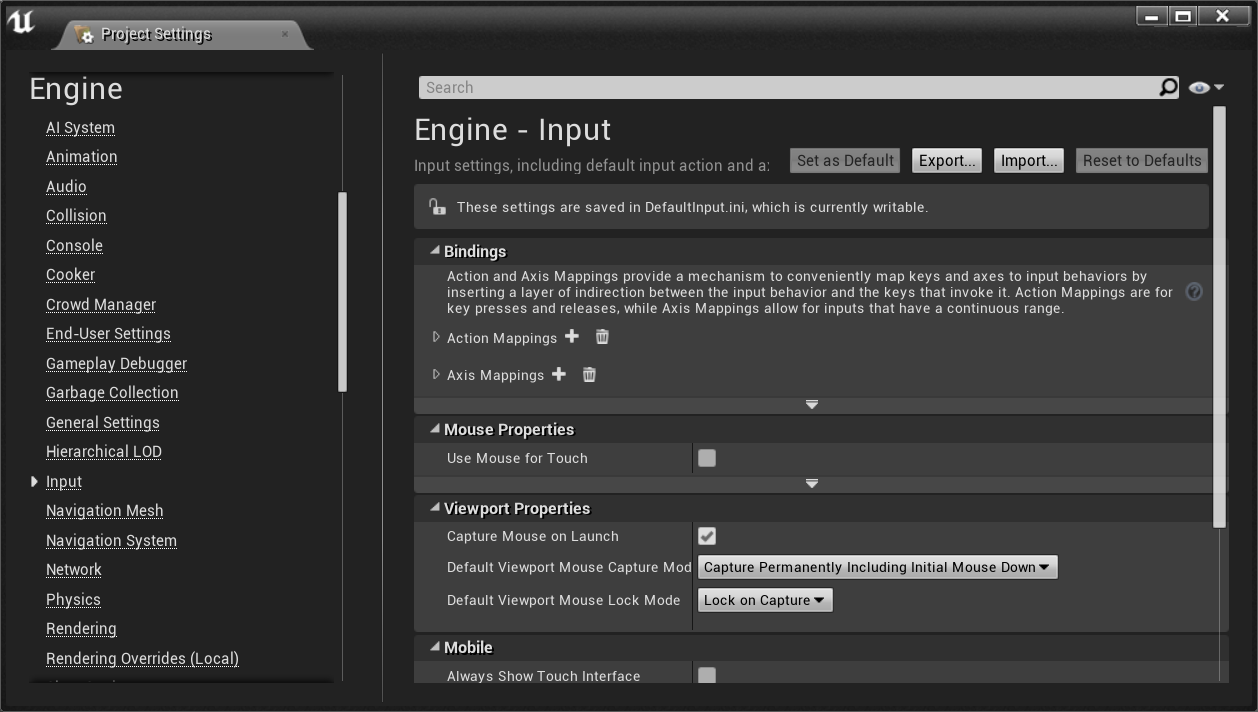
First, I'll need to add the input bindings for the movement. Go to Settings -> Project Settings, then scroll down the left tab to Input under the Engine heading. You should see something like this:
Picture
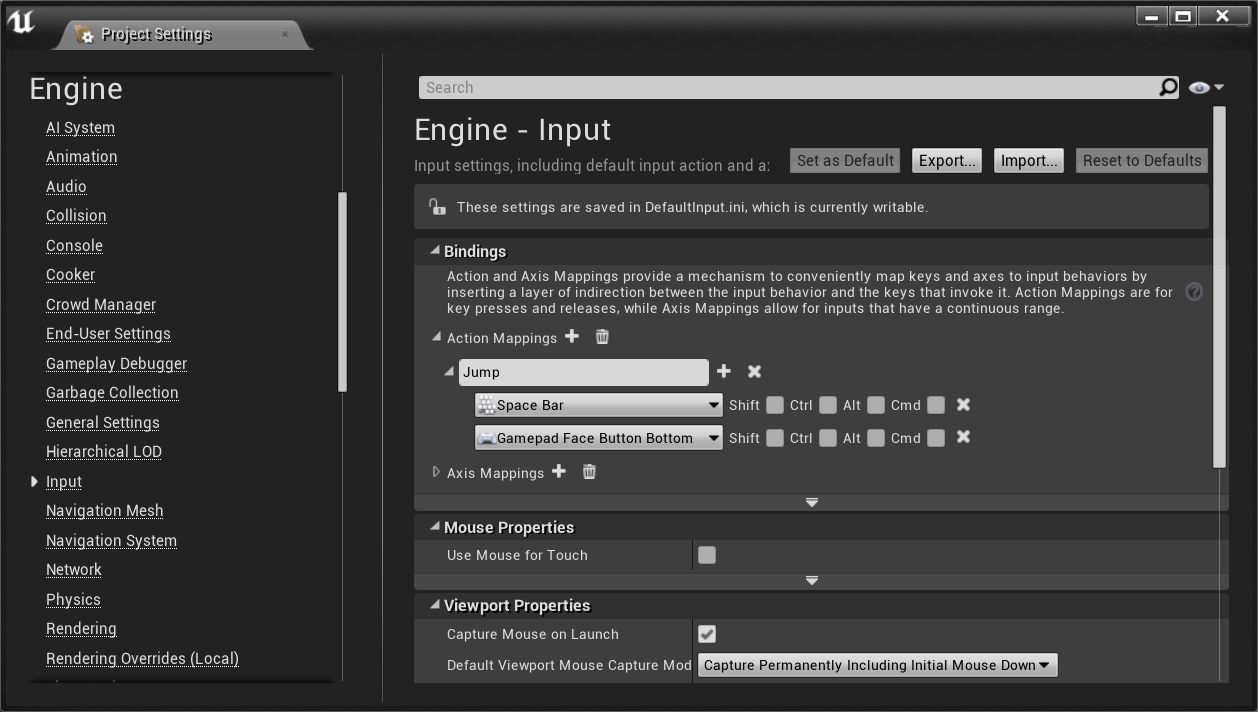
In here you can add the bindings for any input in the game. Action Mappings are used for input without a scaling value, such as a button press on a keypad, whereas Axis Mapping will provide you with a scaling value between 0 and 1 that can be used to scale the movement speed for example. I've added a new Action Mapping first for a Jump method which is triggered by the space bar or with the bottom face button on a GamePad - on an Xbox controller this translates to the A button. 
Picture
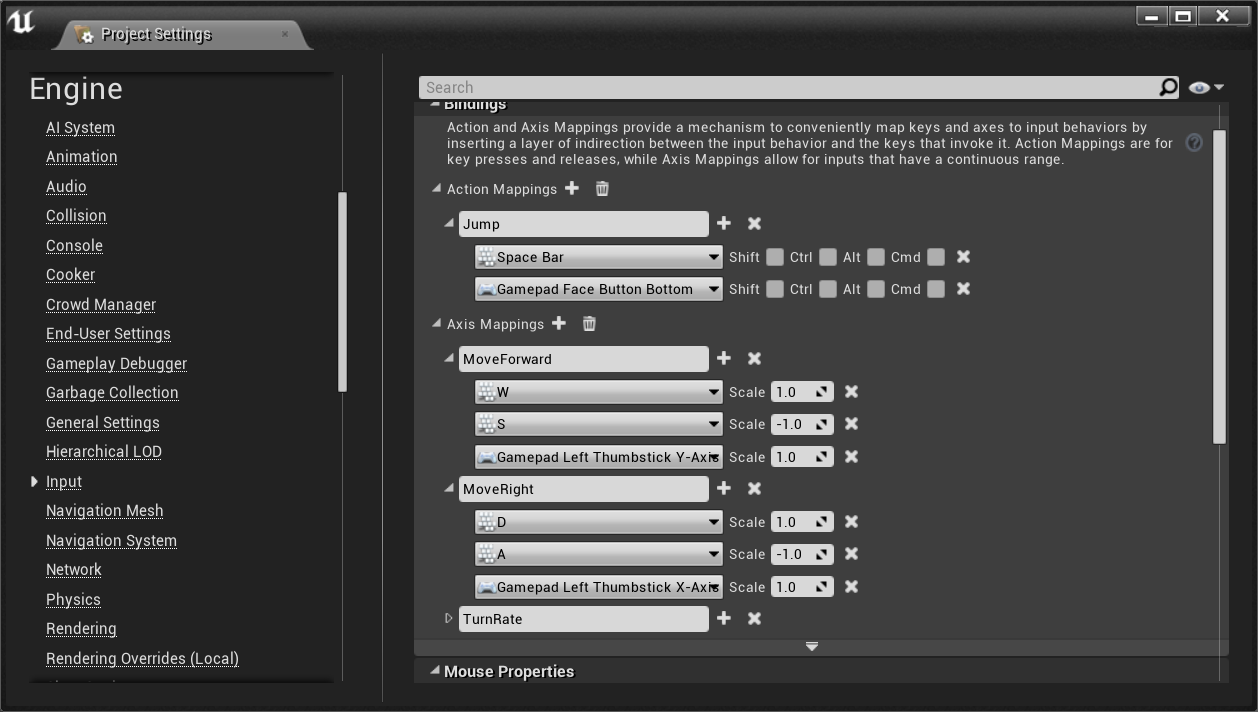
Next I added some Axis Mappings - these are used for character movement as I want my character to move slower if the analog stick is only slightly pressed. There were already some keyboard bindings in here, so I added a couple of bindings for the thumbsticks like so:
Picture
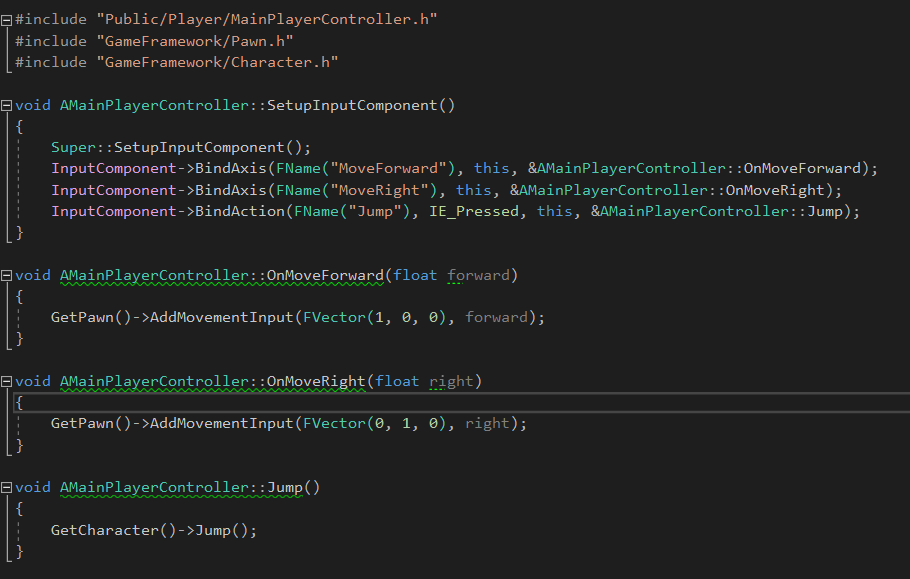
Now onto the fun bit - the code! The standard PlayerController that comes with the test project has a lot of redundant code that I didn't really need for my game, so I created a new one. It's quite a simple class, all it does is bind the input for the mappings defined above. Luckily the Pawn and Character classes have the functionality that I need, so when MoveForward/MoveRight are called I call GetPawn()->AddMovementInput and pass in the direction and the scale value. For the Jump method, I just need to call Jump on the character being controlled - the final class looks like this:
Picture
Now there's some basic movement working! However there were still some tweaks that I needed to do as the movement didn't feel right. First, the character looked like he was sliding around - to fix this, in the custom character class I set the ground friction to 300. This seemed to do the trick, however it may need tweaking in the future.

Next, I wanted a bit of movement in the air so that if the player tries to change direction while jumping it'll move slightly - this was another easy fix, on the character I set AirControl to 1.

Finally, the camera angle wasn't what I was after, I wanted it to be rotated down a little bit more. This was a bit trickier than it should have been, as something was changing my rotation of the spring arm component back to its default. This was due to the Blueprint of the character trying to set it back to the default - after setting the change in the blueprint the issue seemed to be resolved!

The end result looks like this:
Picture
In the next post, I'll explain how I switched the default player model into a custom one.
0 Comments

A Crack in Time (Working Title) - Intro

2/25/2019

0 Comments

 
​This game is my current personal project that I am working on. It is a top-down action game where the player must save the world through multiple time periods, and the player can use time-related powers such as stopping time in a small area around themselves.
There are going to be 5 different periods that the player will have to play through, which uses the same world map but with variations based on the time period - for example, in one time period there may be a small town but in the next time period this town has turned into a city. 

The game is being developed using Unreal Engine 4.21, and this page will be updated with my progress with blog posts that state how I achieved certain functionality.

The milestone I am working on at the moment is to have the character controls implemented. This includes:
  • Character movement & jumping
  • Attacking with a sword
  • Stop Time ability.
Once this milestone is complete I will be working towards defining & implementing more abilities that the player can use before implementing enemy logic.
0 Comments

    Author

    Software developer working on a game in Unreal Engine 4, this blog chronicles the development of the game.

    Archives

    March 2019
    February 2019

    Categories

    All

    RSS Feed